We’ve all been there before. You’re working on your laptop, and suddenly it starts acting up. Maybe the screen starts flickering, or the keys start sticking. Whatever the problem, you must take it apart to fix it. But if this is your first time taking apart a laptop, the prospect can be daunting. Where do you start? What do you need to know? Don’t worry, and we’re here to help. In this blog post, we’ll walk you through everything you need to know about taking apart an HP laptop. Then, we’ll give you a step-by-step guide to taking apart your laptop and some troubleshooting tips in case something goes wrong. By the end of this post, you’ll be an expert at taking apart HP laptops (and maybe even laptops from other brands).
Introduction: Why You Might Need to Take Apart Your HP Laptop
If you’re ever having trouble with your HP laptop or want to upgrade it in the future, there’s a good chance that you’ll need to take it apart. In this section, we’ll outline some reasons you might need to take your HP laptop apart and provide tips on how to do it without any difficulty.
Whether you’re just looking to clean it out or fix a problem, taking your HP laptop apart is not difficult – and can even be fun! With some basic tools (a Phillips screwdriver and a flathead screwdriver are both essential), and some knowledge about how laptops work, taking your HP laptop apart will be a breeze.
Below are some of the most common reasons why people take their HP laptops apart:
1. To upgrade or fix the laptop – If your HP laptop is showing signs of age (e.g., it’s not taking any charges or it’s having problems booting up), you might need to take it apart and replace its parts. In many cases, this can be a fairly easy process – all you need is a Phillips screwdriver and a flathead screwdriver.
2. To clean it out – repeatedly, when something isn’t working right with our HP laptops, the first step is to clean out whatever’s causing the problem. This can be done by removing all of the internal components (including RAM and hard drives), cleaning them off, and then putting them all back together again. Again, this process usually doesn’t require specialized tools – a Phillips screwdriver and a flathead screwdriver will do the trick.
Preparation: What You’ll Need Before You Begin
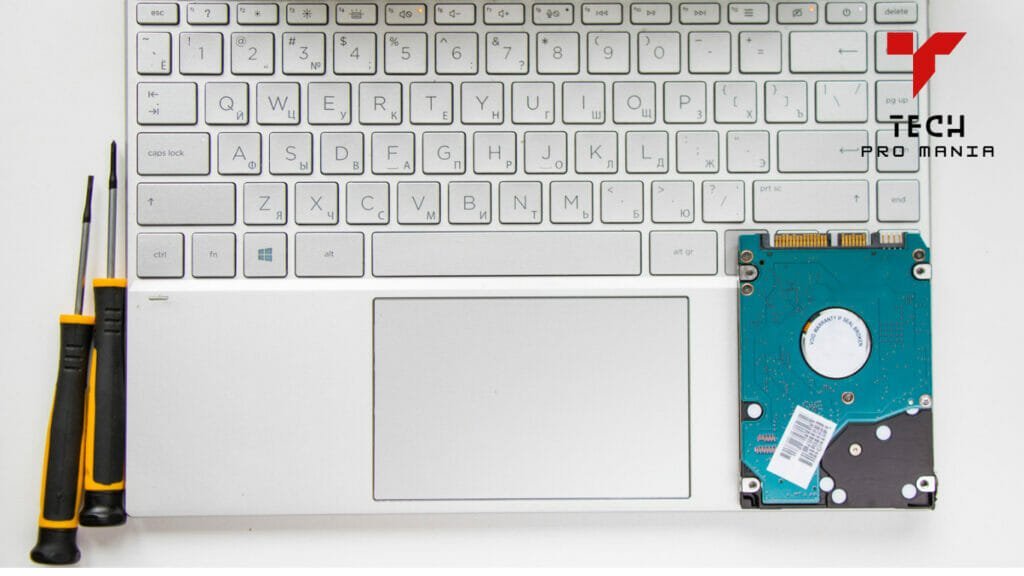
It is important to have the appropriate tools and equipment. You will need a Phillips head screwdriver, the owner’s manual for your computer, any software discs that came with your computer, and a safe, static-free work surface on which to place your laptop.
First, you will need to access your computer’s owner’s manual. This will provide detailed instructions on how to set up and use your computer’s hardware and software. Once the owner’s manual is open, locate the Phillips head screwdriver and unscrew the base of your laptop’s monitor. Next, remove the screws that hold the laptop screen in place. Finally, lift off the screen assembly from your laptop.
Now that you have accessed your computer’s hardware and removed its screen assembly, it is time to prepare your workspace. First, ensure that there are no static or other harmful materials on your work surface; these can damage your laptop screen when it is reassembled. To avoid Electrostatic Discharge (ESD), always use a grounded wrist strap when working with electronics.
It is time to install the software needed for generative AI programming. First, insert any software discs into their corresponding slots on your hard drive. Next, connect your laptop to an electrical outlet using a grounded power cord and plug in any devices you need during programming sessions. Finally, turn on your computer and launch any software programs required for installation by following the prompts.
Step-by-Step Guide: How to Take Apart Your HP Laptop
If you’re looking to take your HP laptop apart, this step-by-step guide will help you get started. By following the steps in this guide, you’ll be able to dismantle your laptop without any trouble! The guide is divided into six easy-to-follow sections, including pictures and diagrams to make the process easier.
The first step in separating your HP laptop is removing the battery and power cord. Next, you’ll need to remove the keypad cover. After that, you can begin removing the thin panel above the keyboard. Be sure to take care when removing this panel, as it can be fragile. Next, remove the two screws holding the entire keyboard assembly. Finally, lift off the keyboard assembly and set it aside.
Now that you’ve removed all of the panels on your HP laptop’s case, it’s time to start working on its internals. You’ll first need to remove four screws that secure the motherboard to its baseplate. Once those are out, you can pull off the motherboard and set it aside for later use.
Next, you’ll want to remove the fan assembly from its baseplate (four screws), then disconnect the fan from its connector (six connectors). After doing so, you can unscrew and remove both fans from their baseplate. Finally, detach the vents to allow you to remove the radiator from its baseplate (three connectors).
Once everything has been removed from its baseplates or chassis- whichever term better describes where everything comes together- it’s time for some cleanup work! First, save your original parts safely by placing them into plastic bags or containers before throwing them away. You’ll also want to prepare your HP laptop’s baseplate with new adhesive before returning the components (optional).
Using adhesives designed for plastics may damage your laptop irreparably! It is usually repairable by a qualified person using specialized tools, but damage to the laptop may occur if not done properly.
The hard part is now back: putting everything back together again! Once the components have been removed and cleaned up, it’s time to put them back together!
First, save your original parts safely by placing them in plastic bags before throwing them away. Then you will need to repair your HP laptop with new adhesive.
Troubleshooting Tips: What to Do If Something Goes Wrong
If you’re having trouble with your computer, there are some things you can try to fix. Malware might be the cause if your computer starts slow. If your screen is flickering or going blank, it could signify hardware failure. Try running in Safe Mode first.
Here are a few tips if you’re experiencing one of the above-mentioned issues. For example, if your computer is slow to start up, try disabling unneeded services or updating your software. If your screen is flickering or going blank randomly, try restarting your computer in Safe Mode and see if that resolves the issue. And finally, if you’re having trouble installing new software or troubleshooting an existing problem, try running in Safe Mode first and see if that clues what may be causing the problem.
To Sum Up
This blog post covered everything you need to know about taking apart an HP laptop. In addition, we’ve given you a step-by-step guide to taking apart your laptop and some troubleshooting tips in case something goes wrong. By following the steps in this guide, you’ll be able to take apart your HP laptop easily!
- How Long Does It Take To Reset A Laptop - July 16, 2023
- How To Change Keyboard Color On Msi Laptop - December 25, 2022
- How To Connect Ps5 To Laptop - December 25, 2022